Pages

Tuesday, May 28, 2013

Painted love

Hi there, nice of you to pop by!

Today I'm sharing my latest scrapbook layout inspired by the Sarah's Cards May challenge here.


It's a couple of photos from this time last year, which show my youngest daughter enjoying painting. We love getting messy in our house, and we're often found in our PJs on the weekend making stuff at the dining room table.


I've replaced the triangles on the sketch with a strip of pennants/bunting, and embossed a couple of the plain pieces of card. I've been really stingy with the patterned paper - the scraps behind the pictures are actually the remnants of the paper I cut the bunting out of!


It's a lovely fresh colour combo, taken from my favourite patterned paper at the moment, the floral one shown here. No journaling though, I'm just showcasing the photos.


And the title? It's one of those that popped into my head - I often use song lyrics in my titles, even if they are a little... altered!

How do you choose your scrapbook layout titles? Do tell ;)

Wednesday, May 22, 2013

This and That - the Wedding Planner

Helloo! How are you, on this fine spring morning? Oh, is it raining where you are? I'm sorry. Here, have some of my sunshine, I expect it won't last long!

A couple of posts ago, I mentioned that I was going to be using This and That for keeping all the bits and bobs that I'm bound to collect when planning my forthcoming wedding. I have never daydreamed about a dress, or who I'd invite, or where I wanted to get married, namely because I come from a family with a lot of divorce, and I could never envision finding someone who I would actually want to spend the rest of my life with!


Then I met Al (or re-met him, as we used to know each other when we were teenagers), and to cut a long story short, got together, spent 4 happy years together, then had two children and spent the next six years walking around in a sleep-deprived, skint state!


Anyway. Back to the This and That. I always get a bit intimidated when I see a whole load of pretty paper. I never want to cut it up. But one of the things I love about the Stampin' Up range is that they are all double sided,and you get two sheets of each pattern in the set. So, to get over the fear, I immediately separated out one of each of the sheets and cut them into two 4x6 and two 8x6 sheets. The other whole sheets are being kept in case I want to make 12x12 scrapbook layouts with them.


The 4x6s went in the little pocket at the back of the journal with the sticker sheets, ready for punching, stamping or tearing. The other sheets just got put in the back.


I then stuck my rough of the save the date card in, with some of the co-ordinating washi tape and one of the stickers. Then out came my trusty bitty butterfly punch, just to pretty it up.


The letter stamps I used for the journalling are the best buy I have ever had. They were in a bargain bin at a local craft shop, and I swear I've used them more than any other stamp set I've had.


I then used the ledger paper to record our guest list. It's very small, because if we wait 'til we can afford to invite everyone, then we will NEVER get married. So we're planning on having a big party next year for the rest of the people. Perhaps I will need another TaT book for then!

I was a little concerned that with the slightly thicker embellishments I was using (the bead on the butterflies and the pearl accents on the flowers) that the journal would be too bulky. But as can be seen from the side view, there is plenty of room to expand with the generous spiral binding!


I'm still waiting on those tips for a smooth, hassle-free wedding ;) Do tell...

Tuesday, May 21, 2013

101 different uses for washi tape - number 2


Use your rolls of washi tape to fill a Le Creuset Salt Pot that you bought in TKMaxx just because it was your favourite colour and was very, very reasonable! What? You haven't got one? Ah. That'll be just me then.

Next time, I promise to have a more universally useable tip!

Monday, May 20, 2013

Rotary stamps are us!

Well hello there!

I did mention the other day that I was rather keen on a certain new rotary stamp from Stampin' Up (see here if you have no idea what I am talking about). I also mentioned that I'd let you see the masked card I was working on. Well..... *drum roll*.... tada!


Here we have a very simple but effective save the day card. I used a 4x6 piece of kraft card, one ink colour, one corner rounder punch and three stamps (all from Stampin' Up - message me if you want details). They literally took me 5 minutes to make 24, once I'd decided on the design, and have saved me a few more pennies to put towards the day itself.

Yes, that's right - it's my save the date card! I'll print the actual details on the reverse of the card, pop them in their envelopes and send them off sometime this week.

I'll soon be sharing my first two pages in my new This and That book, which has been earmarked for organising and recording all the bumf I expect I'll collect over the next five months!

So, for anyone who's done this (getting married) before, here's the time to pass on your handy hints and tips, tricks and things to avoid!  Go on, you know you  want to!

Thursday, May 16, 2013

101 different uses for washi tape - number 1...

... to hold down your stamping mask in a secure yet easily-removable-without-ripping-the-card manner.


If you haven't seen masks before, they're a way of keeping a clear area on your stamp design, say, for a sentiment like the above one will be. You can also use them to protect areas that have been previously stamped if you want to build up more stamped images. I'll show both of these in my next post!

And the above image? It shows a few of my latest Stampin' Up purchases. Washi tape and Serene Silhouettes stamps. Check back tomorrow for my latest project with my new love - the This and That rotary stamp:

This is going to get used so much - I have a regular date stamp from Staples, but this has phrases as an added extra. I reckon you could easily use the phrases alone, so am going to have a little experiment!

See you tomorrow, but if not, have a fantastic weekend!

Monday, May 13, 2013

One basic QCAS design, three levels of pretty!

A very happy Monday to you (and to my  US readers, Happy belated Mothers' Day).

I've got a lovely little illustration here of how you can take one quick, clean and simple (QCAS) card design and add a bit more oomph to get another two designs. The basic card design is very similar to my QCAS card here, from last week, with the patterned paper mounted on dimensional foam stickers to raise it off the front (supplies listed at the end of the post).


 I used the punched out shape, flipped it over and punched another contrasting colour to create the trio. I love using the visual triangle in my designs - three is indeed the magic number! (thanks De La Soul).

The main sentiment was stamped on the flipped patterned paper, and the plain card label was pierced to add interest. I then stamped "soon" in the recess, and added "..." after the "Get Well". The recessed shape has also been pierced around, but it is difficult to see this on the patterned paper.


To take it up a level, you could add some "bling"- I've used teeny pearls as accents, highlighting the visual  triangle once again.


Or, if you have more time, and the inclination, you could add some die-cut leaves, a few flowers and use the pearls as the flower centres. This card is winging its way to my Great-Aunt who is recovering after an operation, but it's definitely  a design I will reproduce! 


If you have a go, please let me know in the comments below! I'd love to see what you come up with.

Stampin' Up supplies: "Twitterpated" designer series patterned paper,  "Rose Red" card stock, "Wild Wasabi" card stock, paper piercer, decorative label punch, "Perfectly Penned" sentiment stamps, "Little Leaves" Sizzlits die, Pearl Basic Jewels, StazOn Ink Pad, SNAIL adhesive - All available from me - 10% off your first order over £30, free postage on orders over £50! Contact me on: themagpiemakerie@hotmail.co.uk, or phone 07708949170.


Friday, May 10, 2013

Decisions, decisions!

Hi there! Happy Friday. I hope you've got something good planned for the weekend?

Me? Well, if I get some crafting time, I want to document the story behind this photo:


The difficulty is, do I scrapbook it? Or try another art journal page? Oh deary deary me! #firstworldproblem

So, what are you up to this weekend? Do tell ;)


Thursday, May 9, 2013

Tea's up!

I don't know about you, but I am a massive tea fan. I like it strong, no sugar, with enough milk to stop the enamel being stripped off your teeth! I have been called a "tea Nazi", but I do believe the following post will prove that I'm  not just a Yorkshire Tea girl.

When I joined Stampin' Up, there was a great stamp set featuring teetering tea cups, tea bags, pots, the lot, and I just had to have it. I do have a minibook and some cards planned with them, but first off, here's a little label I made for my tea jars:


I got a little carried away, decanted all my teas into Bonne Maman jam jars (gotta love those ribs and gingham check lids). and made a veritable Tea Station. There was even a mug stamp, so I let the coffee in on the game!


Simple things please simple minds, hey? Every time I make a brew now I can tell my yorkshire from my assam (the others aren't quite so tricky to distinguish).

What's your favourite daytime beverage? Do tell ;)

Wednesday, May 8, 2013

Love Hollywood?

Hello again! Nice to see you. Sit down and have a slice of this:


I don't know if you've been watching the Paul Hollywood bread making series on BBC recently, but I did. I watched the heck out of it. There's something about  that blue-eyed silver Scouser kneading floury mounds that gets me a little bit hot under the collar (sorry, my darling OH - it's the beard!).

I bought myself one of his books and had a good cyber-flick through the recipes from the TV series on the Beeb website. The image above shows the wholemeal soda bread that was whisked up from start to finish in 45 minutes. It is gorgeous, and begged to be smothered in jam. Or butter. Or any other thing that takes your fancy!

It's 500g half-and-half mix of strong white and wholemeal bread flours, 20g baking powder, 1 teaspoon of salt, 75g melted butter, 270ml milk and 30ml buttermilk. I didn't have buttermilk, but I just put a squeeze of lemon juice in the 30 ml milk, and left it for 5 minutes.

You bung it all in a bowl, mix and shape into a ball on a lined baking tin. slash the top and sprinkle with a little flour. Cook at 200deg C for 25 mins. Cool (if you can wait that long) on a wire rack.

It sort of reminds me of a massive scone mixture. I think I might try to handle it much less next time, as I know this makes my scones lighter. Or even substitute the buttermilk for 30ml plain yoghurt. Hmm...

I'll be sharing some more of my baking adventures in the near future - watch this space for pitta (out of this world) and pizza.

What's your favourite bread product? Or bread producer? Do tell ;)

Tuesday, May 7, 2013

Quick, clean and simple (CAS) card


This is such a quick and simple card that took 5 minutes to make.

I cut a piece of patterned paper (from my much-loved but barely used stash) to a size slightly smaller than my folded card.

I then punched out the label shape from one corner, and used a paper piercer and template to pierce around the recess.

I used this frame to stamp the sentiment  through onto the card itself.

I mounted the card on foam pads to give a slight raise, and then stamped and punched the teensy butterfly to stick to the corner. A few bits of sparkle, and job done.

 A really quick and easy go-to design for last minute "I forgot it was *insert name here*'s birthday/anniversary/job interview" card - just change the sentiment, and off you go!

I used:
(Check out next week for a punch review Martha Steward vs Stampin' Up.)

Are you a "Clean and Simple" card maker, or do you like a bit of frills and fancy? Or, if you haven't made your own cards before, what would encourage you? Do tell!

Sunday, May 5, 2013

This and That Special Offer - 15% off bundle until end of May 2013


Your life is: Fabulous. Quirky. Exciting. Perfectly messy. And happening really fast. So we’re happy to introduce our newest product line that lets you capture it all on-the-go. This and That will debut in the 2013-2014 annual catalogue, but we’re giving you the chance to get it now!


From 1–31 May you can get Stampin' Up's five This and That products in a bundle for 15 percent off! Or, you can buy them separately through June and into the new catalogue (but why would you do that when you can get them all for at a discount?). Watch for more This and That products added to our line in the coming months!

I'm awaiting my delivery, but once I get it, I've got a very specific purpose for mine. Something that will result in a very special day late October...

Saturday, May 4, 2013

National Scrapbooking Day - May 4th 2013

Hellooo there! Hope you're enjoying some spring sunshine today, on (inter)National Scrapbooking Day (or Star Wars Day - May the forth be with you!).

I've got a couple of layouts to share with you today, and a little revelation. I've been scrapbooking on and off since 2009, mostly off, as I have two young children (2 and 5). So the number of layouts I've done in the last year was nonexistent.

But I take a lot of photos. And I would rather do something with them than have them languishing unseen on my hard-drive. Hence my recent "project life" photos-into-divided-page-protectors frenzy.

Now on to the revelation. I'm going to stand up and admit that I like clean and simple. I want to be one of those scrapbookers who can create lovely layers, and artfully arranged embellishments, but I can't! Well, I can(ish), if I agonise over it for about three weeks. Like this one:


It's a gorgeous photo, but there was no story. I'm not kidding when I say it was sat on my desk for three weeks, if not more. And it's not even that complicated. Just some washi tape strips, some splats of ink and some basic embellishments. Three weeks!

Then I did this next layout. Another set of cracking photos, with great colours in it. And this took me about an hour.


 And that's when the revelation hit me. Or rather, two revelations hit me.  1 - If I choose a patterned background, I have to do a lot less fussing, because the paper is pretty enough to use as is; and 2 - I'm lazy Less is more!

I like this LO much more than the first one, and it caused me much less anxiety. Scrapbooking shouldn't be about being anxious. Creating is supposed to help you relax!

And one of my all-time favourite LOs that I did was this one, created for Scrapbook Inspirations magazine for their Ready, Steady, Scrap section:


And that is so simple. Clean, uncluttered, but pretty and with enough little details to draw the eye here and there.

What helped me realise was thinking about all the LOs that I loved creating, and cards that I'd made throughout my life, and realising that "Clean and Simple" is a valid way to scrapbook (as is any way of scrapbooking). I'd indoctrinated myself into thinking that what I was doing wasn't "worthy". And that's nonsense. What we create is so worthy of our time spent creating it,  but only if we enjoy creating it! (otherwise it's just work).

So, that's how I'm gonna roll from now on. Play to my strengths (colour combos and paperpiecing embellishments) and avoid my weaknesses (layers and frills).

Have you found your style/groove yet? Do share :)

Friday, May 3, 2013

Spring - Summer catalogue


I have 4 sets of Stampin' Up 2012-2013/Spring-Summer collection catalogues up for grabs - you can have one if you just pay the £2 P&P.... Great for inspiration! Some products are retiring soon, so get one and get your order in fast! I offer free P&P for orders over £50.

Main Catalogue


Wednesday, May 1, 2013

A gluey papery journey

Well hi there. Nice of you to pop by. Have a seat and grab a cuppa.

I mentioned yesterday that I'd had a go at art journaling. I've never been a diary/journal writer. But then I've always reflected about things. Actually putting stuff down on paper just seemed a little bit like hard work to me.

I've been hoarding a couple of Julie Kirk's Plundered Pages packs, with the idea that I'd eventually get round to doing something awesomely arty and deep and meaningful with them. Then came the day when I had gathered enough self-confidence, gesso, glue and something to journal about. My daughter has been mithering me for ages about when she is going to get glasses, and her only reason is that she wants to be like me. This made me feel both flattered and worried! Something definitely needed writing down.

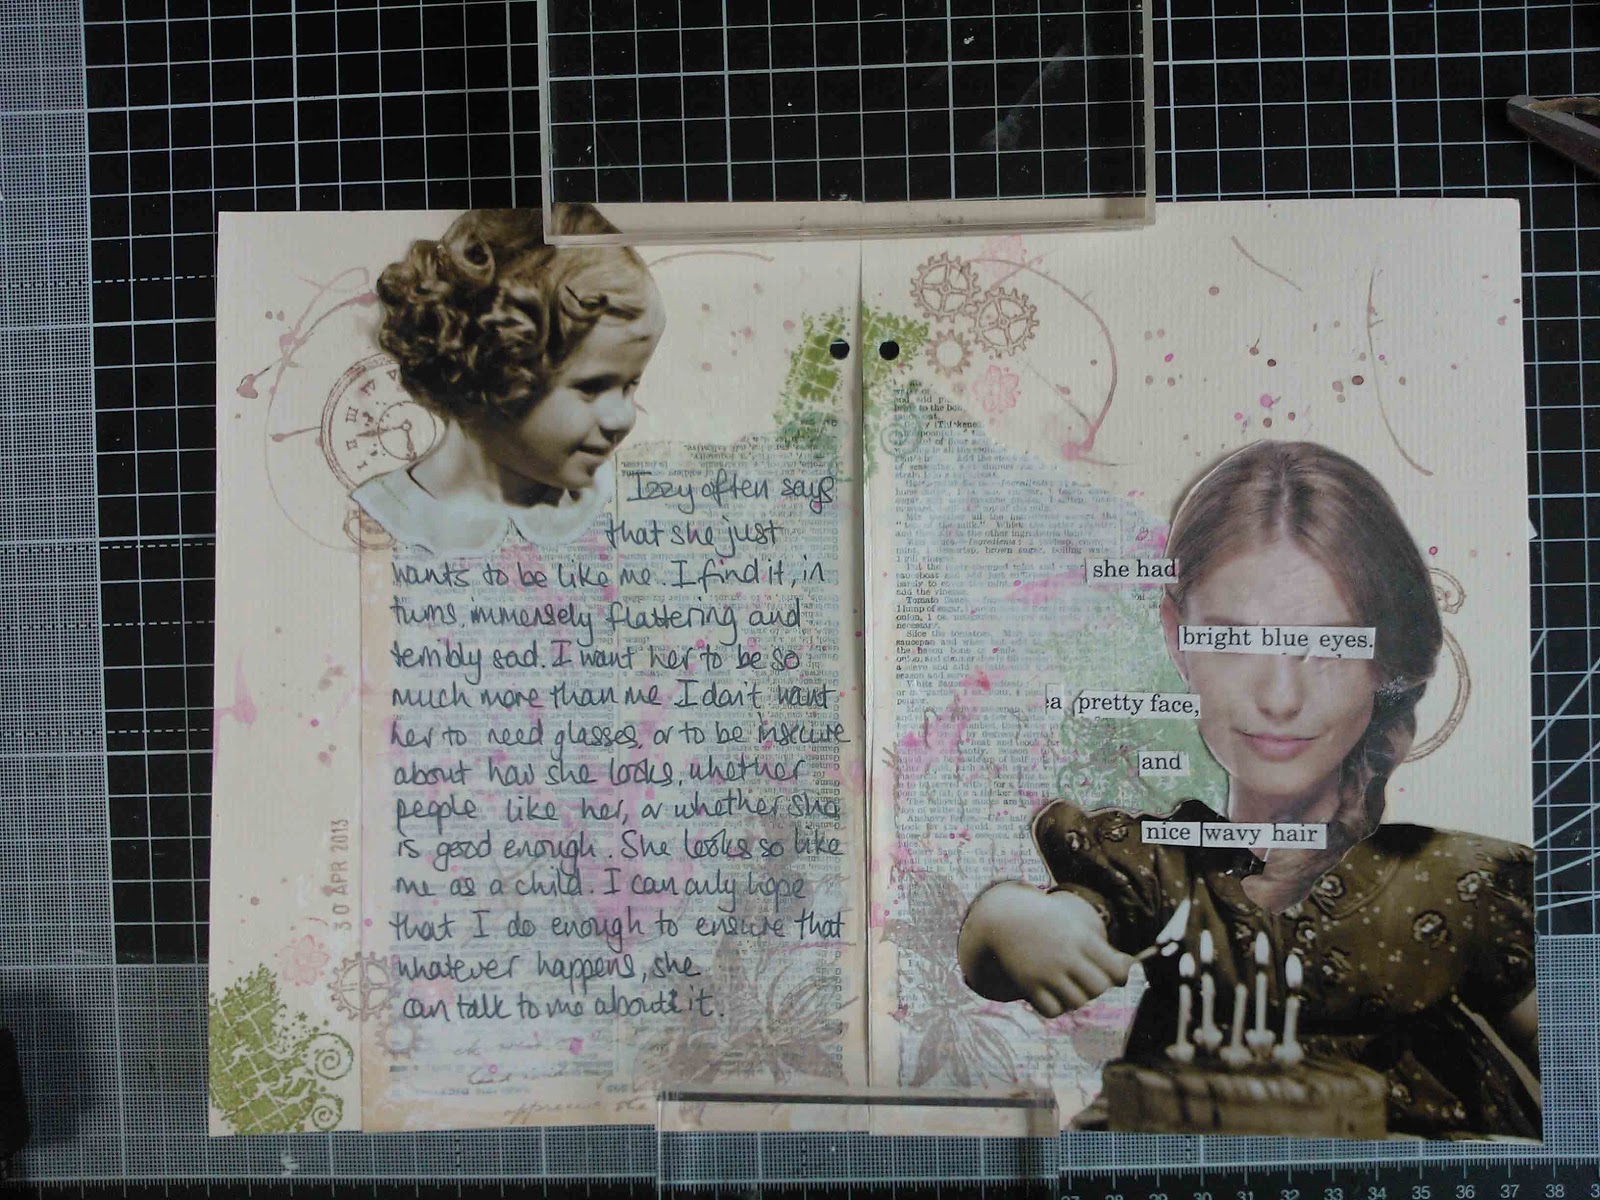
So I started with a piece of A4 card cut in half, and stuck two pages from an old dictionary from my Plundered Pages pack (henceforth known as PPP) - I ripped them a little, and turned one upside down.


I then painted some gesso all over the printed pages, using a sponge. (Gesso is pronounced "jesso" - who knew? Not me, as I discovered when I went in to an art shop to buy it!)

I then flicked and splatted some brown watered down ink all over the page, discovering as I did so that it had split into its component colours, pink and murky green.


Now this was unexpected, but like most crafty accidents, totally serendipitous in that it helped me choose a colour scheme! So I pulled out my green, pink and brown ink pads, and grabbed a few stamps and went to it. I stamped mostly in three focal areas on each side, just because that's how I arrange my embellishments etc in scrapbooking. The ink that was stamped on the gesso went a lovely muted colour, another unexpected effect.


I then flicked a load of pink ink on the page, and stood back to admire my handiwork. There was a bit of empty space in  the middle of the bottom, and so I took a large ornate stamp and stamped it in different directions on each side of the page. This squidged the pink ink quite nicely, adding to the arty farty look of the page (!). I added a few little pink flower stamps to balance out the green and brown clusters...


... then I decided to stick down the pictures I'd torn out of a magazine earlier. I also cut up a children's book page from my PPP, and split up the appropriate phrases to stick on my page.


I then picked up my pen and bravely journalled (journaled?) my actual feelings - go me! The black ink of my favourite handwriting pen looked so stark on the muted page, and so I rubbed some white chalk over it to soften it a little.


A little outlining of the pasted images, and I was done.


I'm really quite pleased with the finished project. I think it will provide a foil for the project life mass photo display/storage, adding more meaningful day-to-day life stuff. If that even makes any sense!

I was greatly helped in this by reading Julie Kirk's much pinned art journal tutorial and the UKScrappers series on art journaling (thread here). Thank you to those people who put all that effort in!

So, what do you think about Art Journaling? Have you ever tried it? Thought about it? And most importantly, is it spelt with one or two 'l's? I still don't know! Do tell...